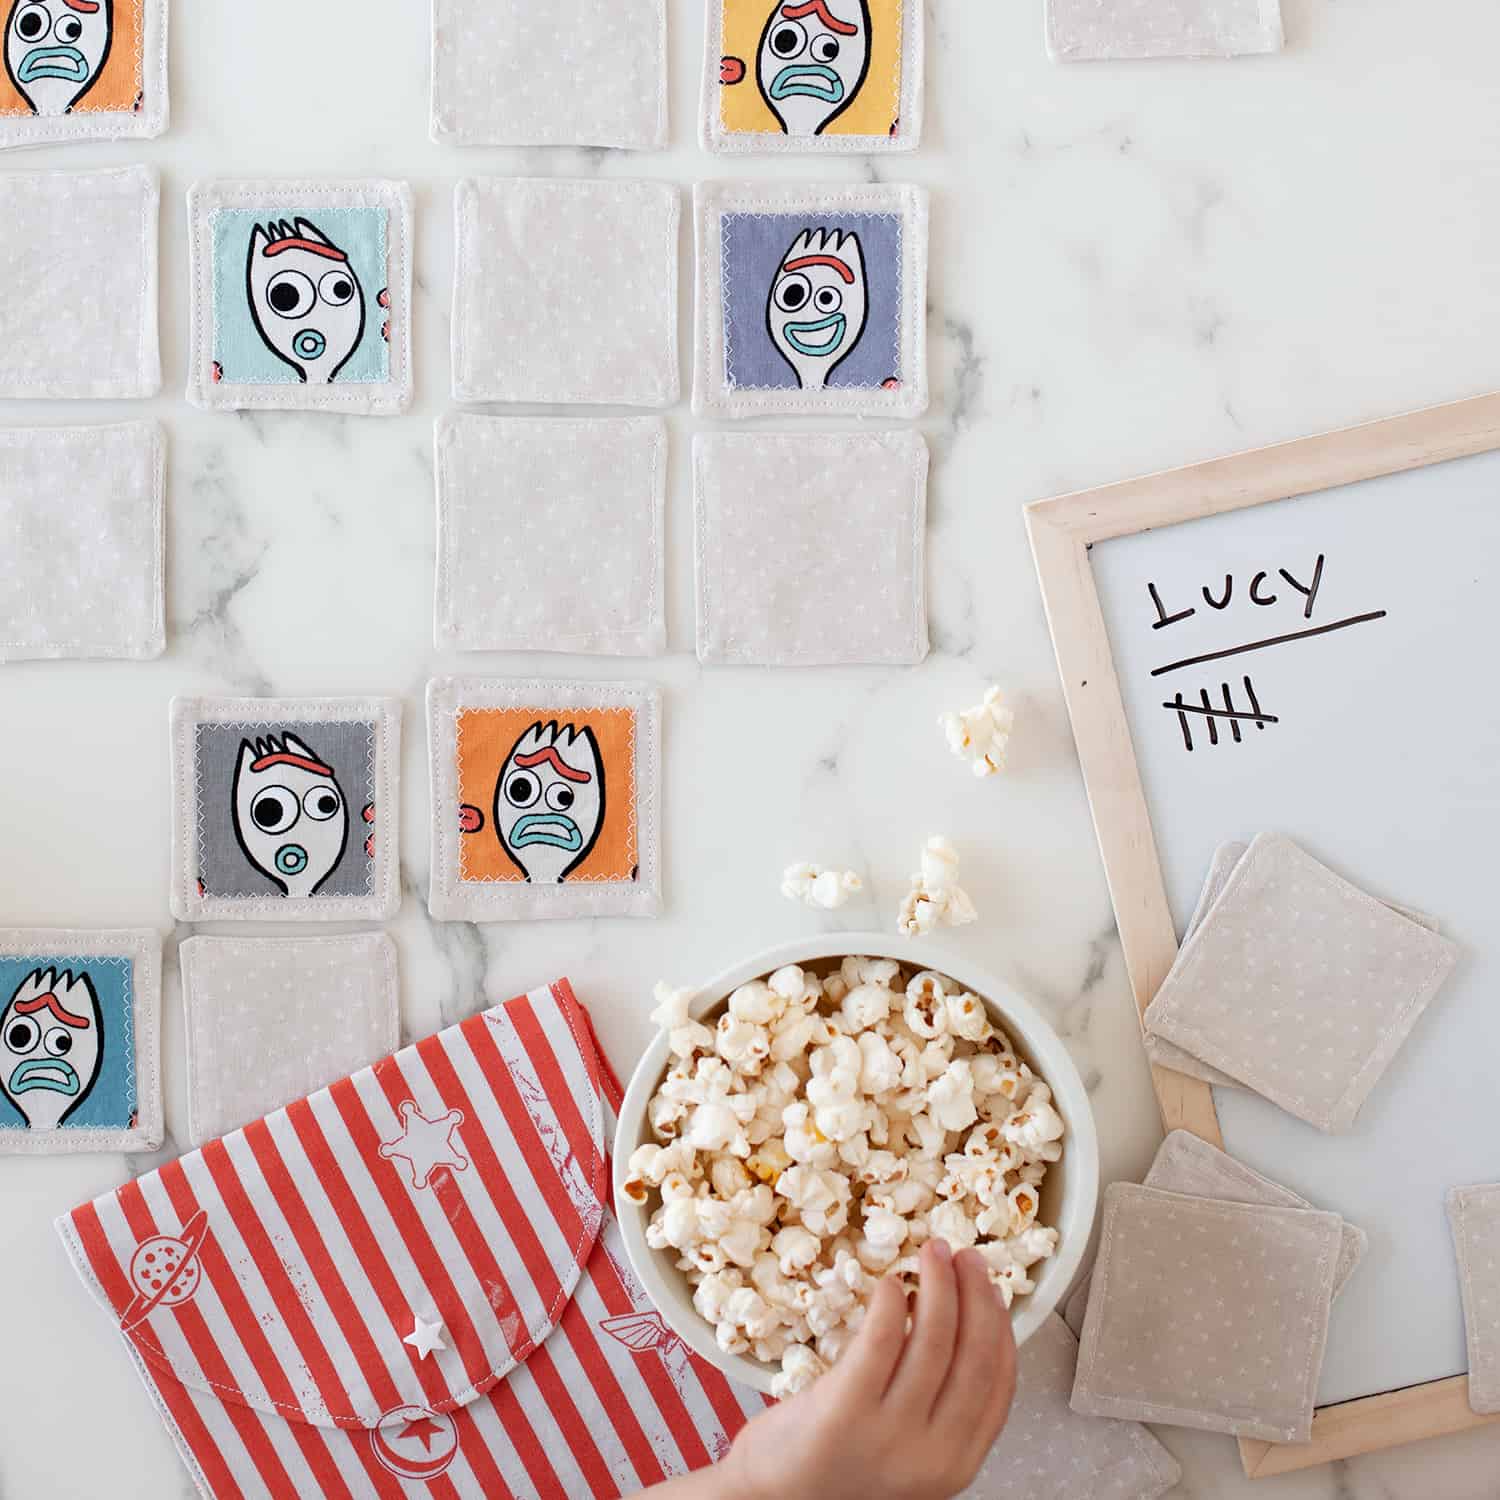
 Family nights are a favorite at our house! We always make a big bowl of popcorn and then settle down for a kid-friendly game or a movie that all of us will enjoy. During our last family night, we watched Toy Story 3 in preparation for seeing the new Toy Story 4 movie in theater. Going out to the theater with the whole fam is a special event for us, so I was super excited to hype it up even more by creating a handmade memory game with the Toy Story 4 fabric in partnership with JOANN.
Related: For more kids activities and printables check out Childhood Magic!
JOANN has an exclusive line of Toy Story fabrics which excited my kiddos and got the crafty wheels in my head spinning fast. As soon as I saw the square-patterned Forky fabric, I knew it would be perfect for a handmade memory game! I also planned to make a pouch to hold the memory game pieces, so I grabbed some of the Toy Story 4 cotton striped fabric that looks like a classic popcorn bag.
This fabric memory game was easy and inexpensive to make, since I used savings from the JOANN app to buy the fabric and to save on a special pair of snap pliers. But if you don’t want to get as involved in making a similar memory game for the kiddo in your life, I’ll give you some easy swaps in the directions below.
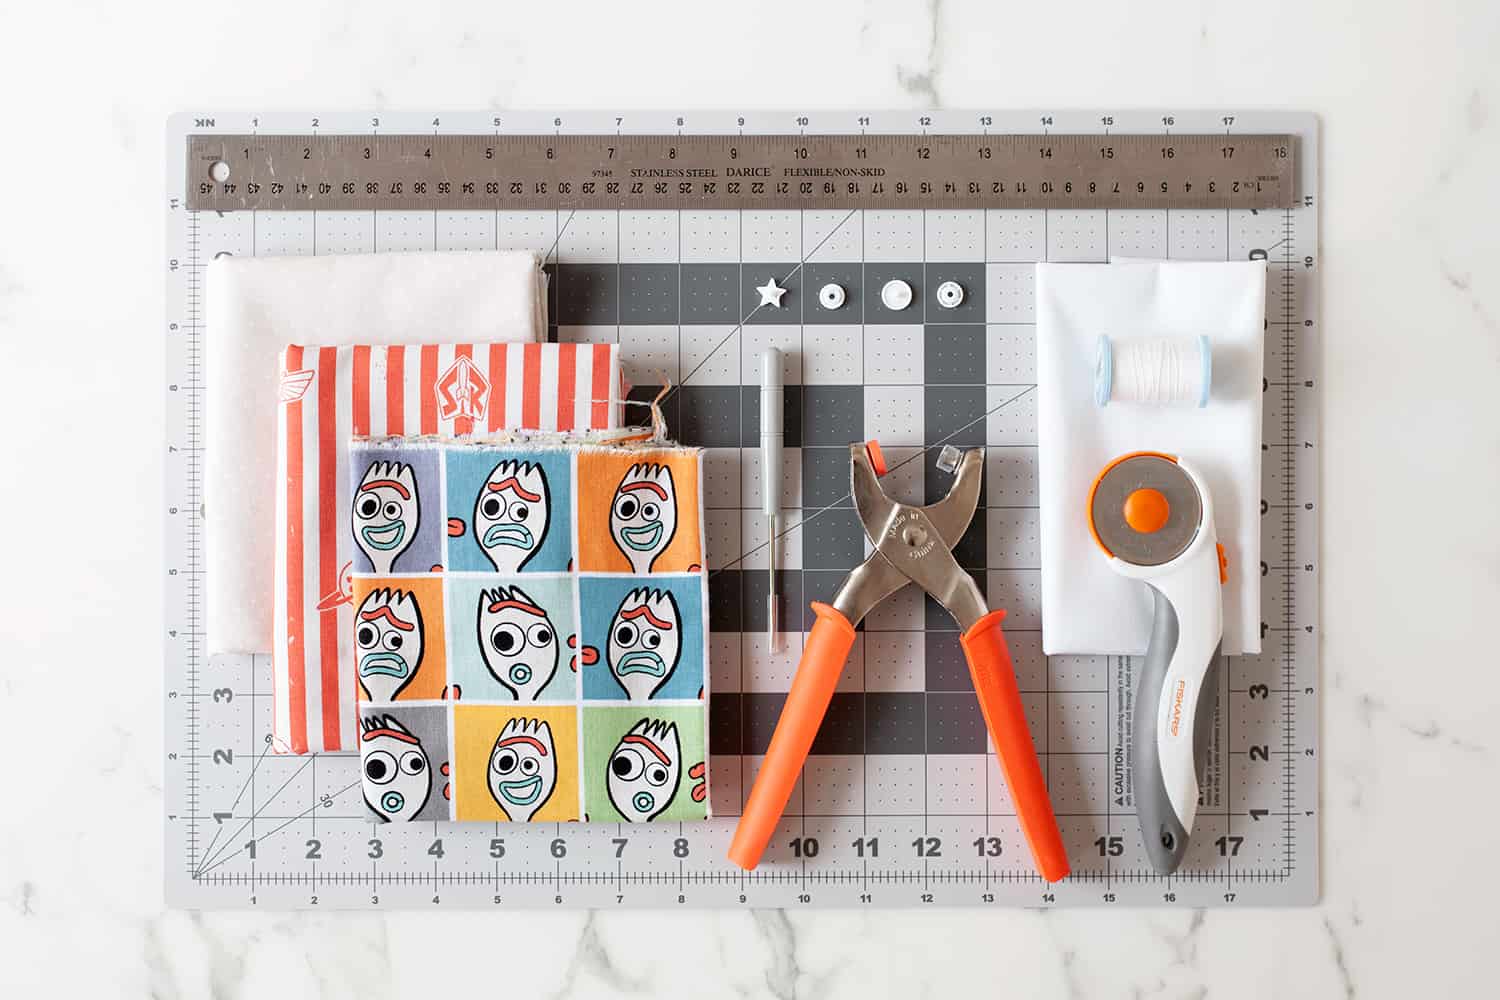 Materials:
-1/4 yard of Disney Toy Story 4 Forky fabric, available exclusively at JOANN
-1/2 yard of Disney Toy Story 4 cotton stripe fabric
-1/2 yard of a light neutral cotton fabric. I chose one from JOANN with a subtle pattern.
-Plastic snap pieces
-Coordinating cotton thread
–Medium-weight fusible interfacing
Tools:
-Cutting mat
–Rotary cutter
-Ruler
-Iron
-Straight pins
-Sewing machine
–Snap Pliers (optional)
-Pinking sheers (optional)
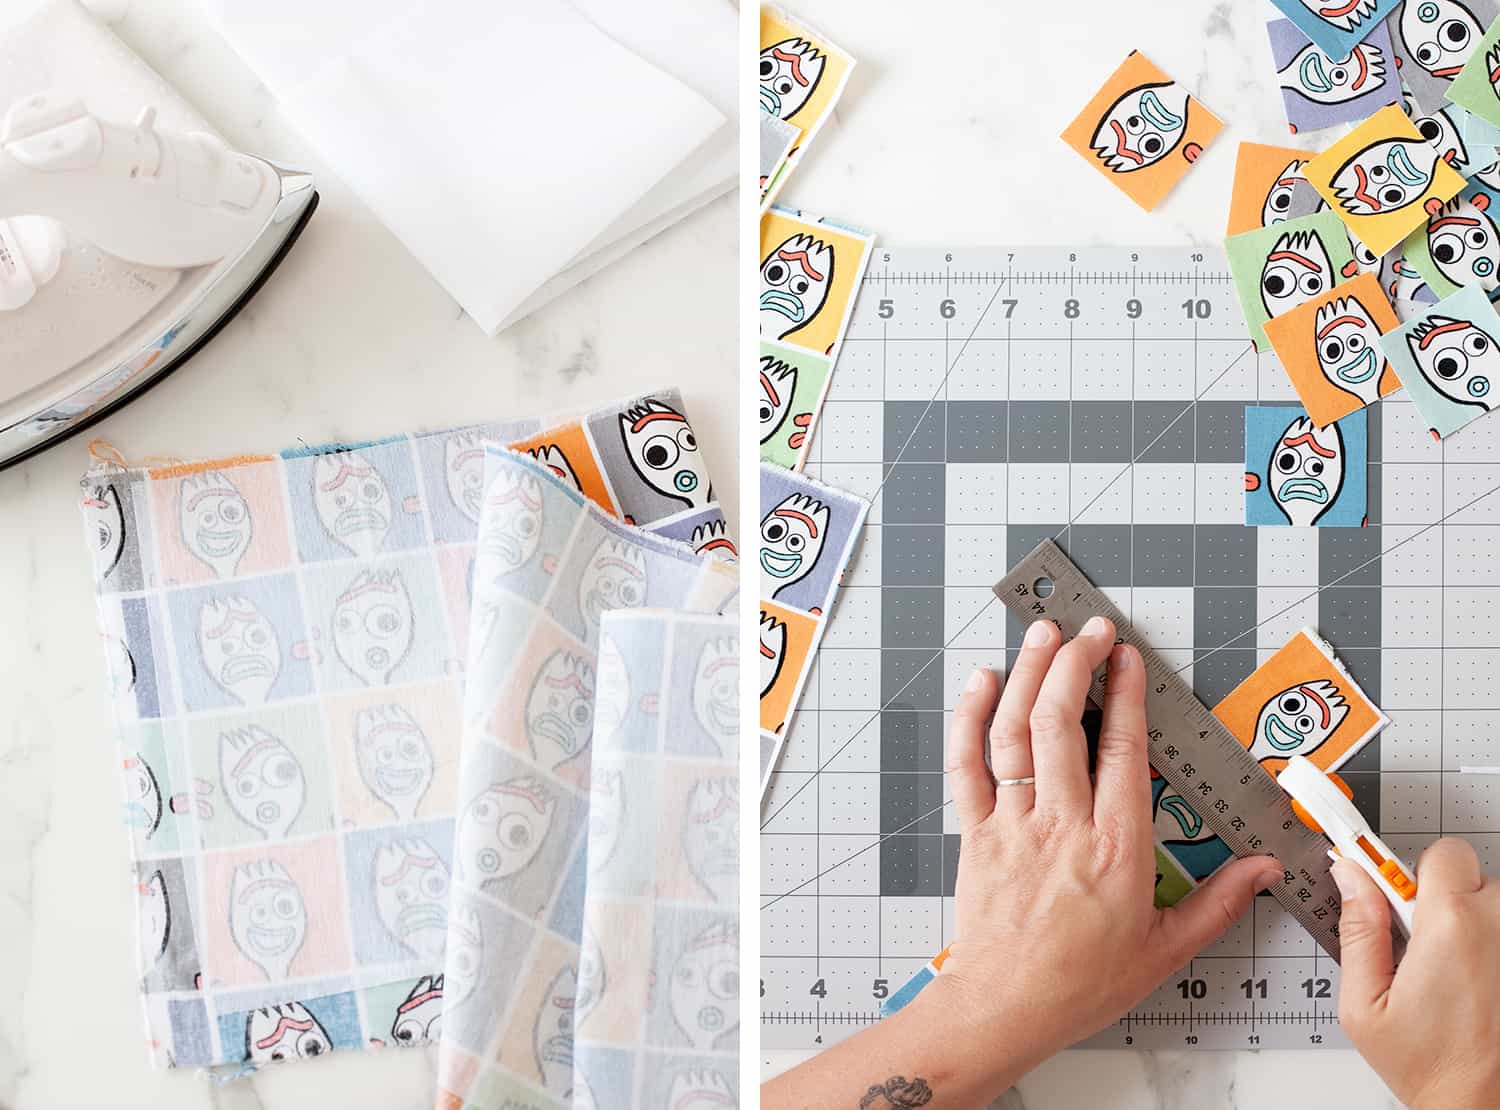 Step One: Prewash all of your fabric and pop it into the dryer.
Step Two: Iron the interfacing onto the back of the Forky fabric. Follow the manufacturer’s instructions listed on the back of the interfacing. Usually it requires using a damp press cloth and pressing with a hot iron for 15 seconds.
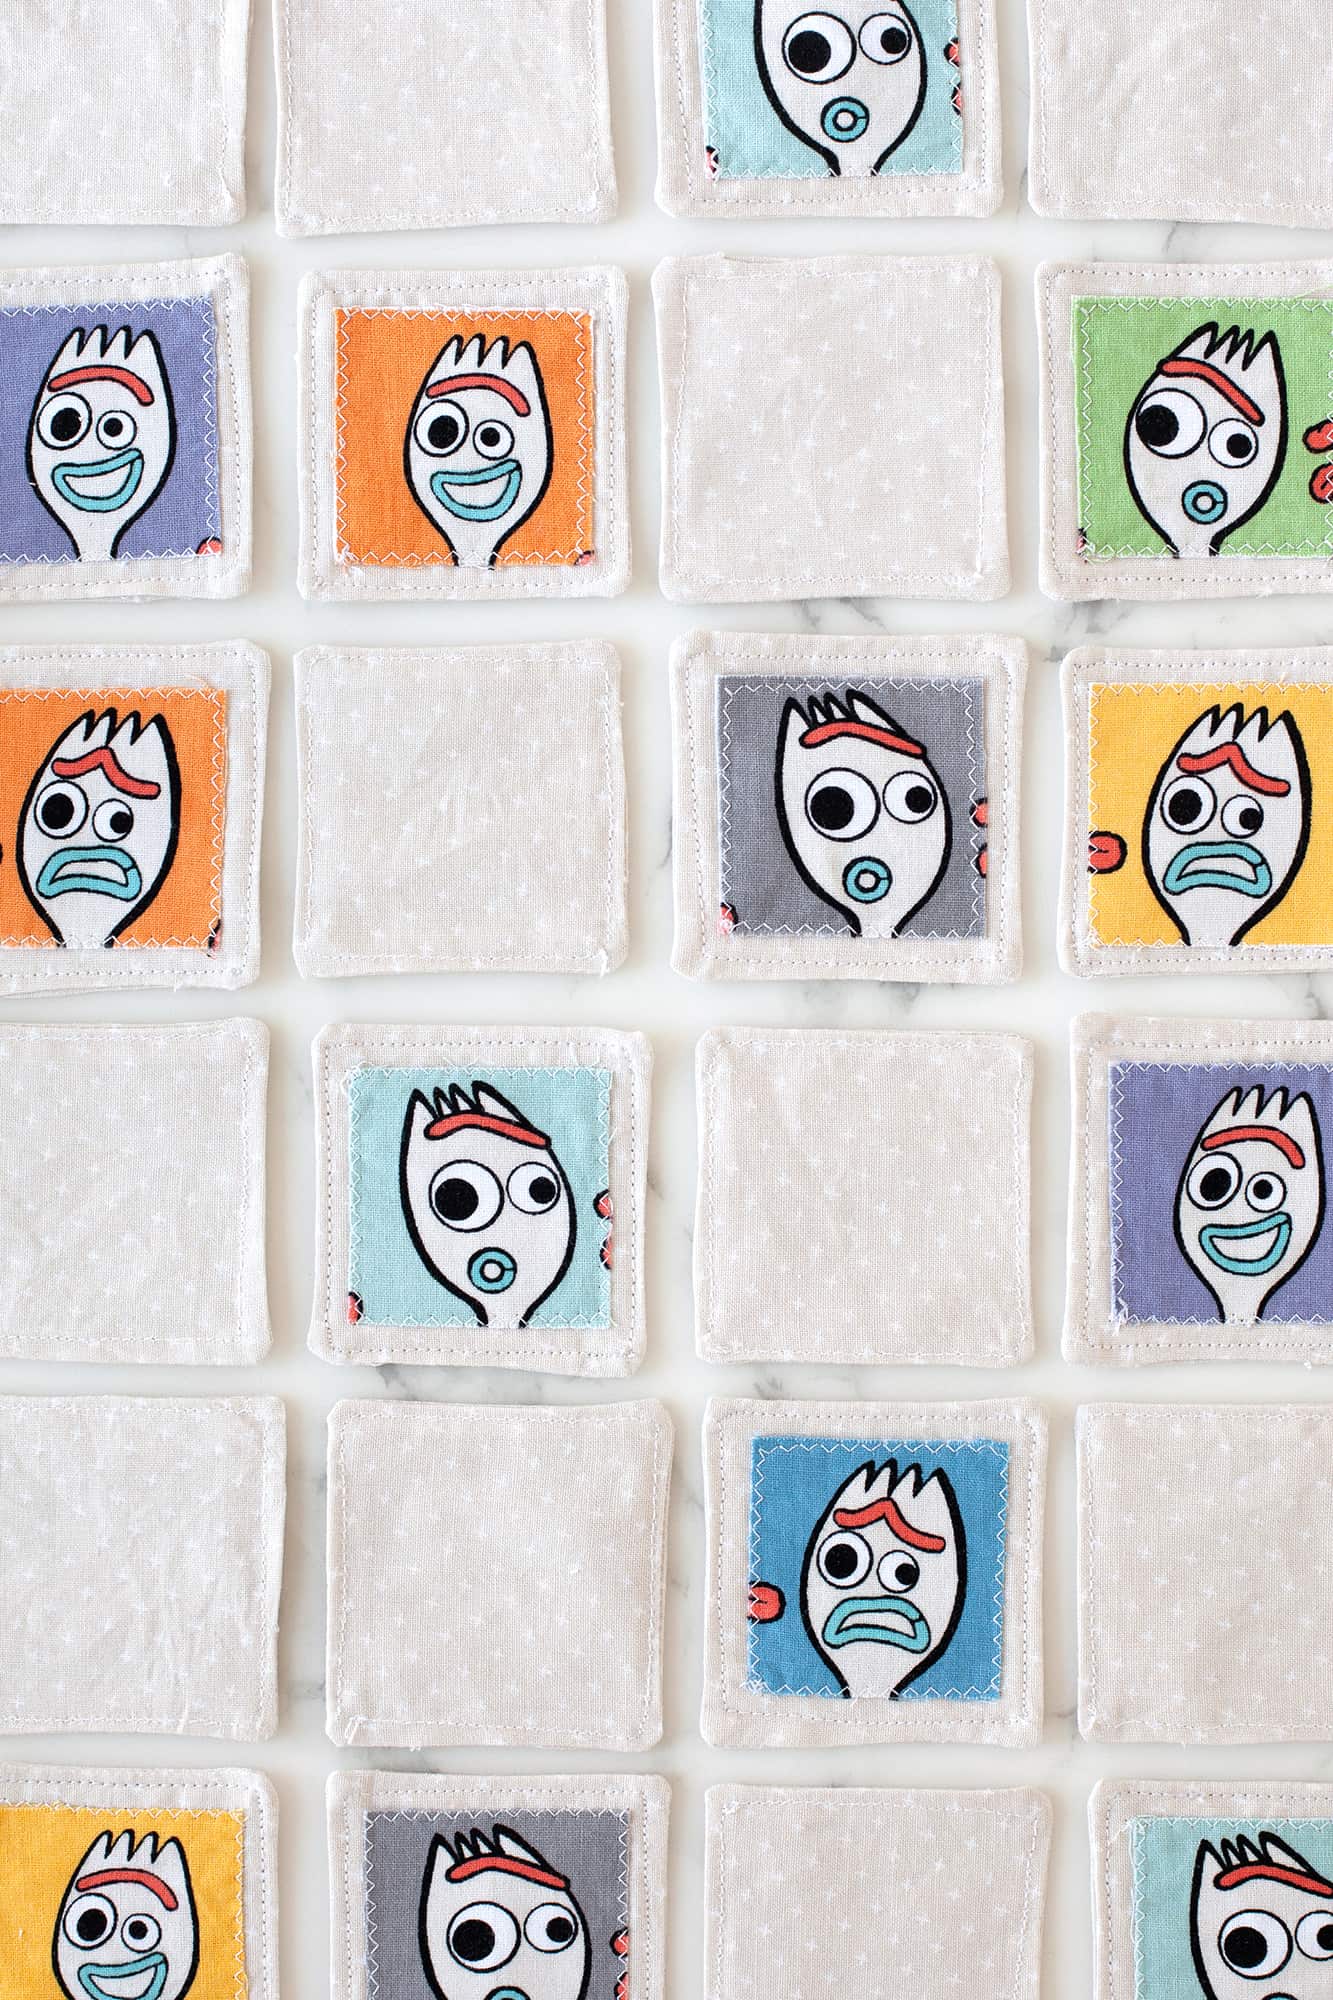
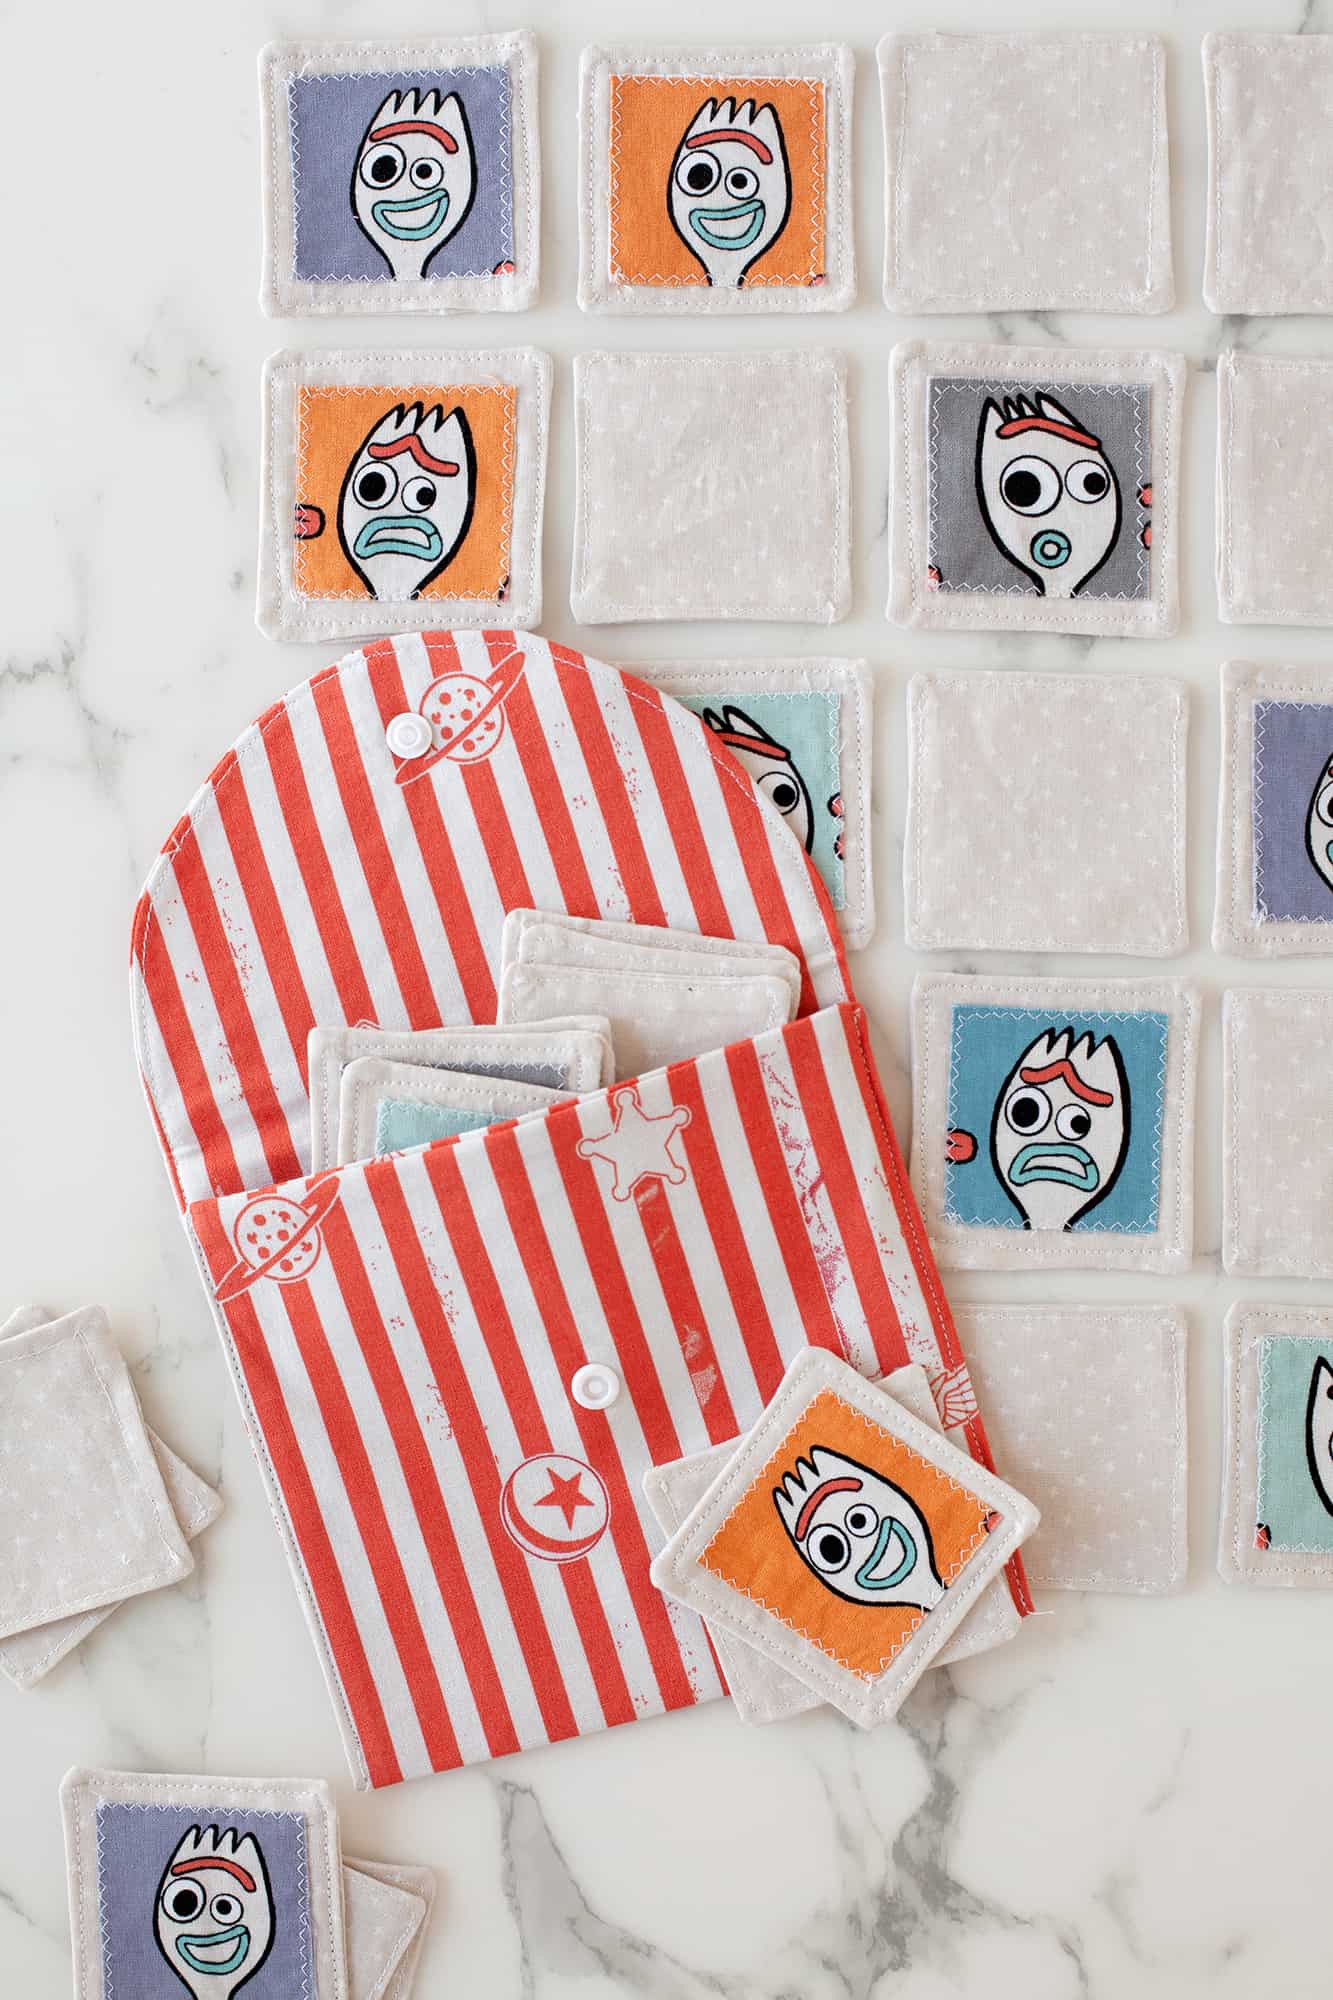
Step Three: Use a cutting mat, ruler, and rotary cutter to cut out each square of the Forky fabric.
Tip: When having your fabric cut, be sure to ask the JOANN cutting counter attendant to not cut the faces in half and to cut about 1/4″ above the Forky face, to allow for some unraveling in the wash. I had enough faces here to do more than 4 of each color and facial expression. You will want to have an even number of faces for the memory game.
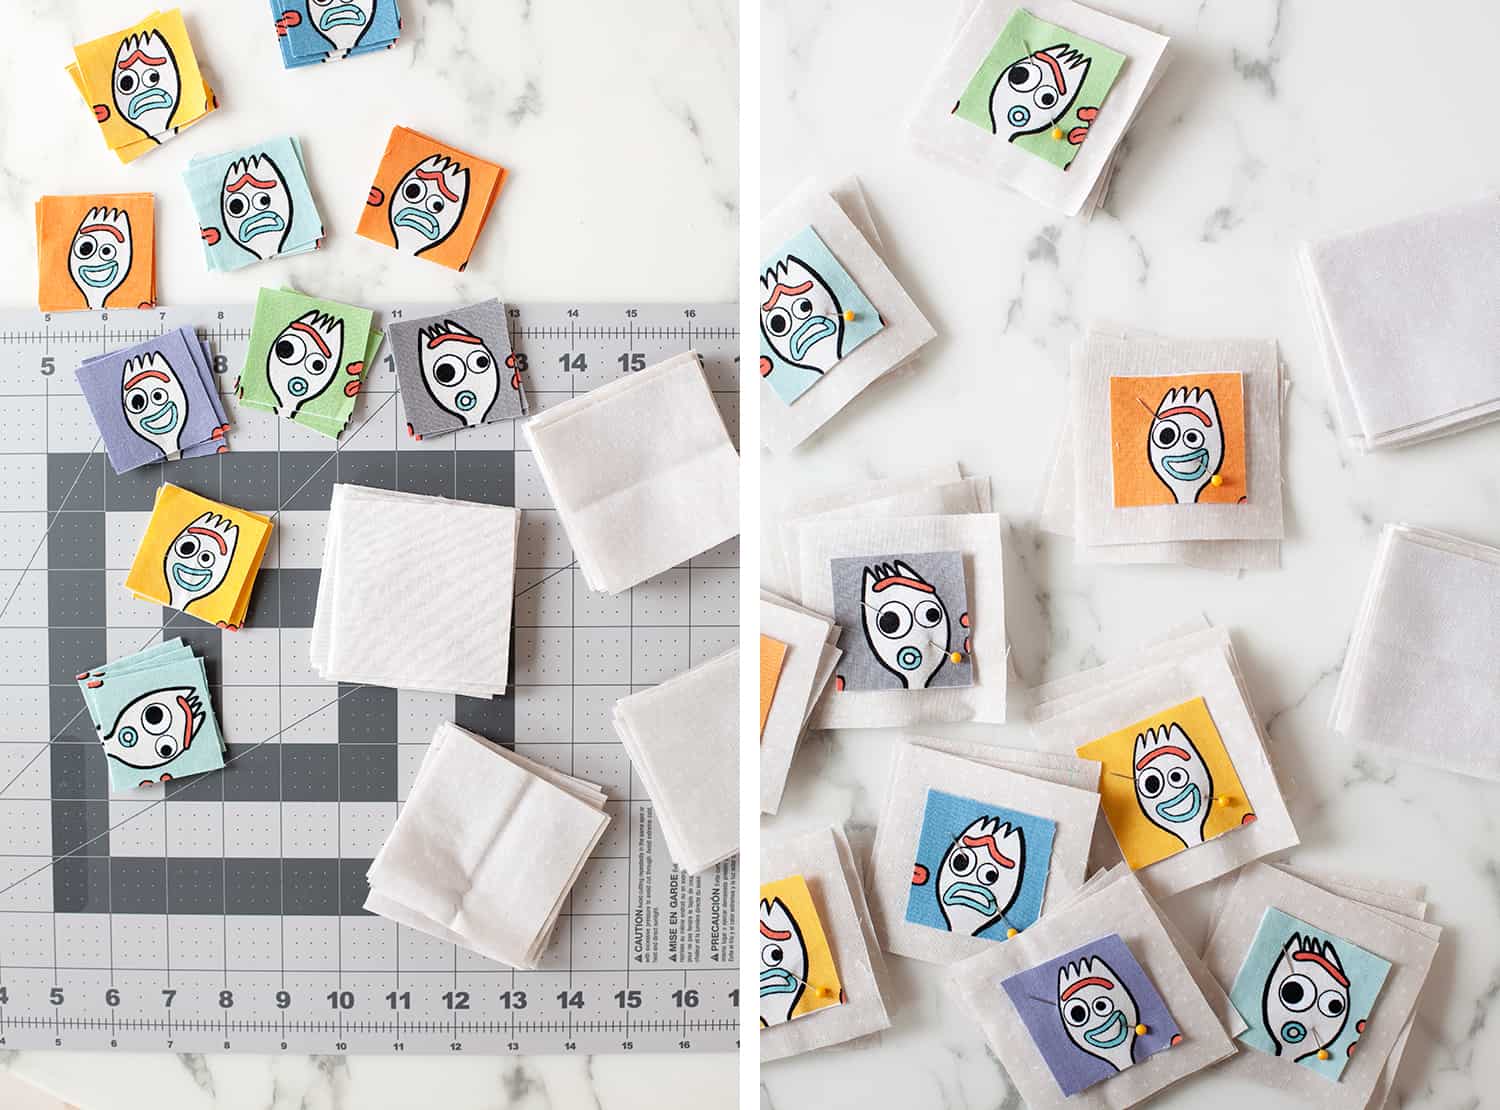 Step Four: Cut your neutral cotton fabric into 3″ squares. You will need to cut two squares for every Forky face you plan to use in the game.
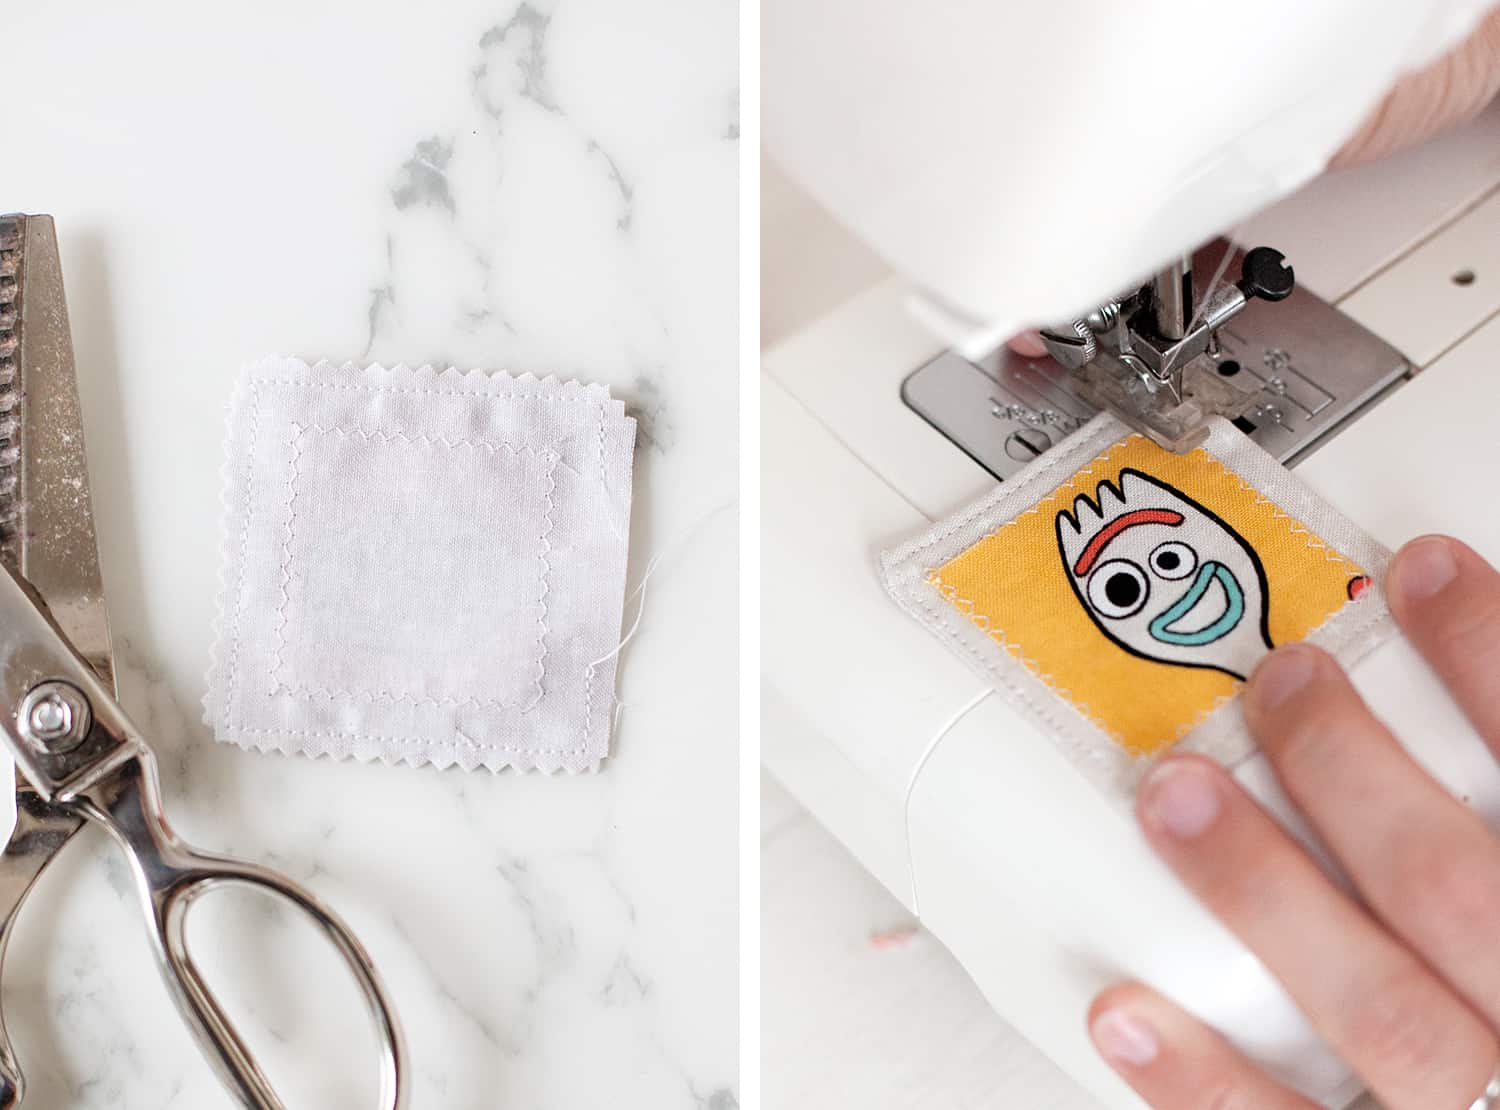
Step Five: Pin each Forky face onto the center of a 3″ cotton square. The right side of both fabrics should be facing up.
 Step Six: Use a zig-zag stitch to attach the Forky faces (stabilized with interfacing from step two) onto the 3″ cotton squares. Remove pins as you sew.
Step Seven: After attaching each Forky face to the 3″ cotton squares, pin the squares to the remaining plain 3″ cotton squares. These should be pinned with the wrong sides facing out. Then stitch 1/4″ from the edges, leaving 1.5″ space open on the middle of one side for flipping the squares right-side-out.
 Step Eight: This is optional. You may use pinking sheers to remove some of the bulk of the hem which can be helpful when poking out corners after you’ve flipped the squares right-side out.
Step Nine: After trimming, flip the squares right-side out and use a non-sharp, yet still somewhat pointy object (such as the handle of a seam-ripper) to push out the corners. Then press with an iron.
Step Ten: Use a sewing machine to top stitch around the border of the pressed square.
 Time-Saving Tip: If you prefer a crisper look for your memory game, you may choose to use 3″ felt squares rather than woven cotton. It will also save you time from sewing, flipping, pressing, and top stitching, which you need to do when using woven cotton. For the felt option, just stitch the Forky faces onto a 3″ felt piece, stitch that piece onto a plain 3″ felt piece, then trim the edges if you desire. A bit simpler and will give you a different look.
 I decided to sew a coordinating fabric pouch for holding the pieces when we’re not playing the game. Of course, you may choose to use any type of baggie you already have, but where’s the fun in that?
 Step One: Cut out two 7.5″ x 17.5″ rectangles from the pouch fabric. Be aware of how the pattern on the fabric will line up and try your best to keep the pattern looking balanced on the rectangles.
Step Two: Use a round object in your home to trace a rounded edge onto the end of each rectangle.
Be sure one piece of fabric is upside down and the second piece is right-side-up when cutting the round edges. The upside-down piece will be the outside of your pouch, and the right-side-up piece will be the lining.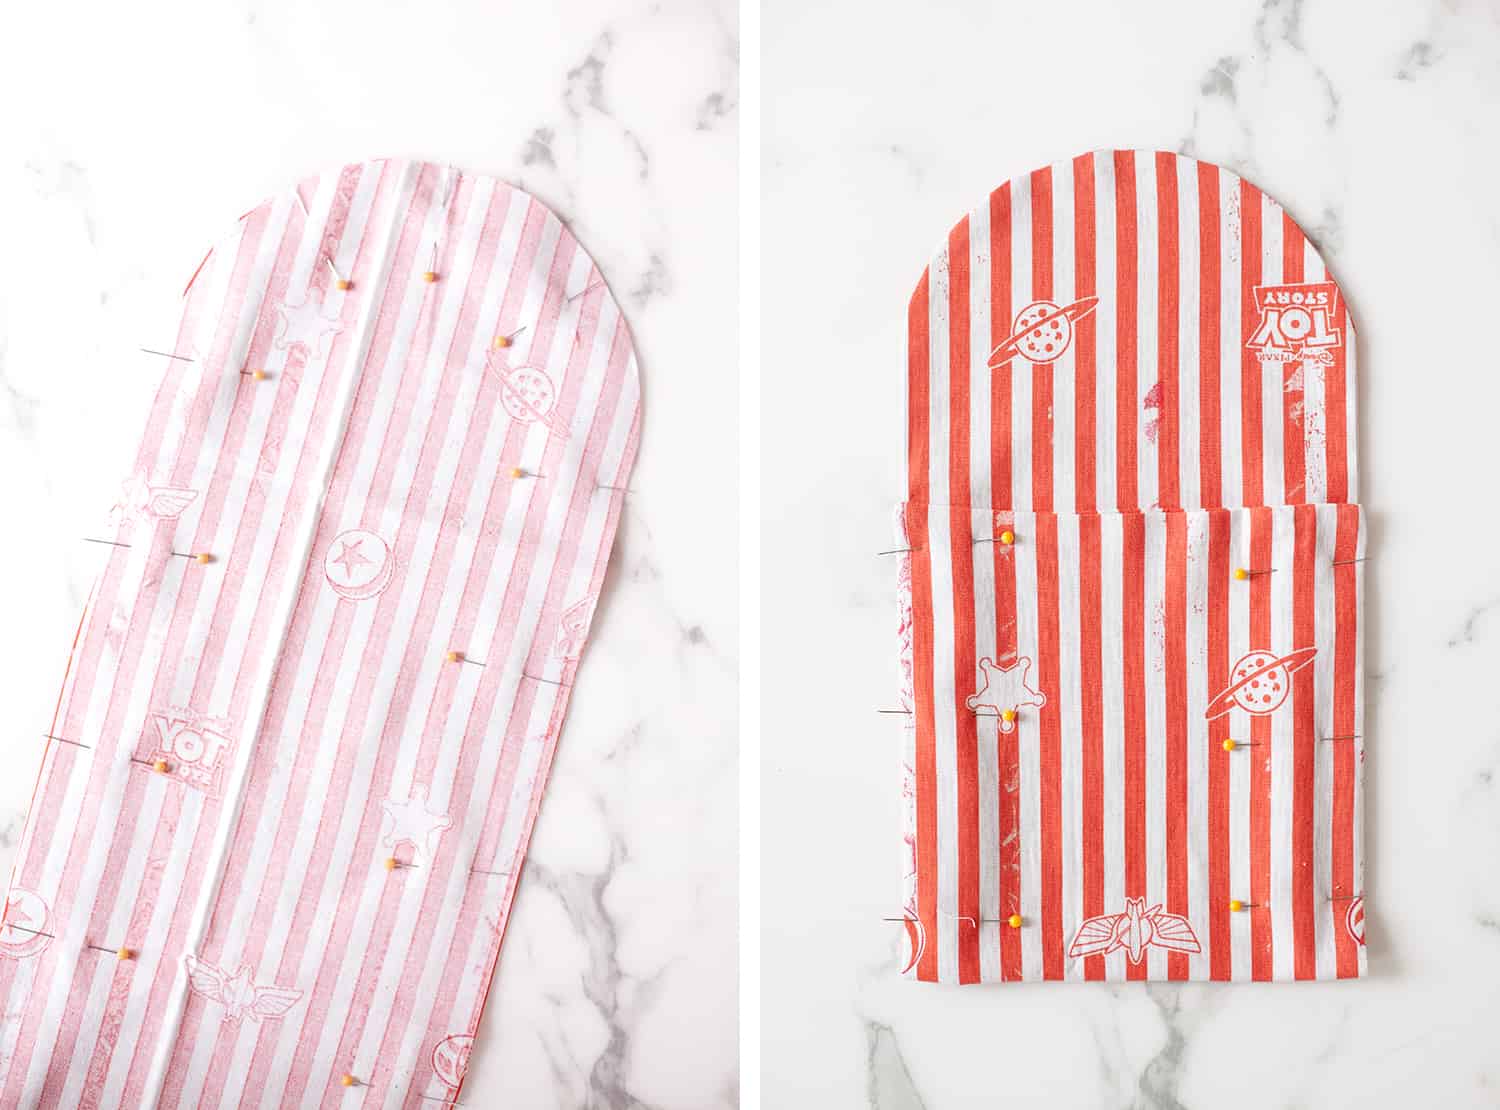 Step Three: Layer your rounded rectangles together with their faces together (wrong sides out) and a piece of medium-weight interfacing on the top of the stack. Pin the layers in place then stitch 1/4″ from the edge, leaving a 3″ opening at the middle of the bottom for flipping it right-side-out.
Step Four: Flip the sewn together pieces right-side-out and press the edges. Then fold up the bottom of the pouch as shown above right and pin into place.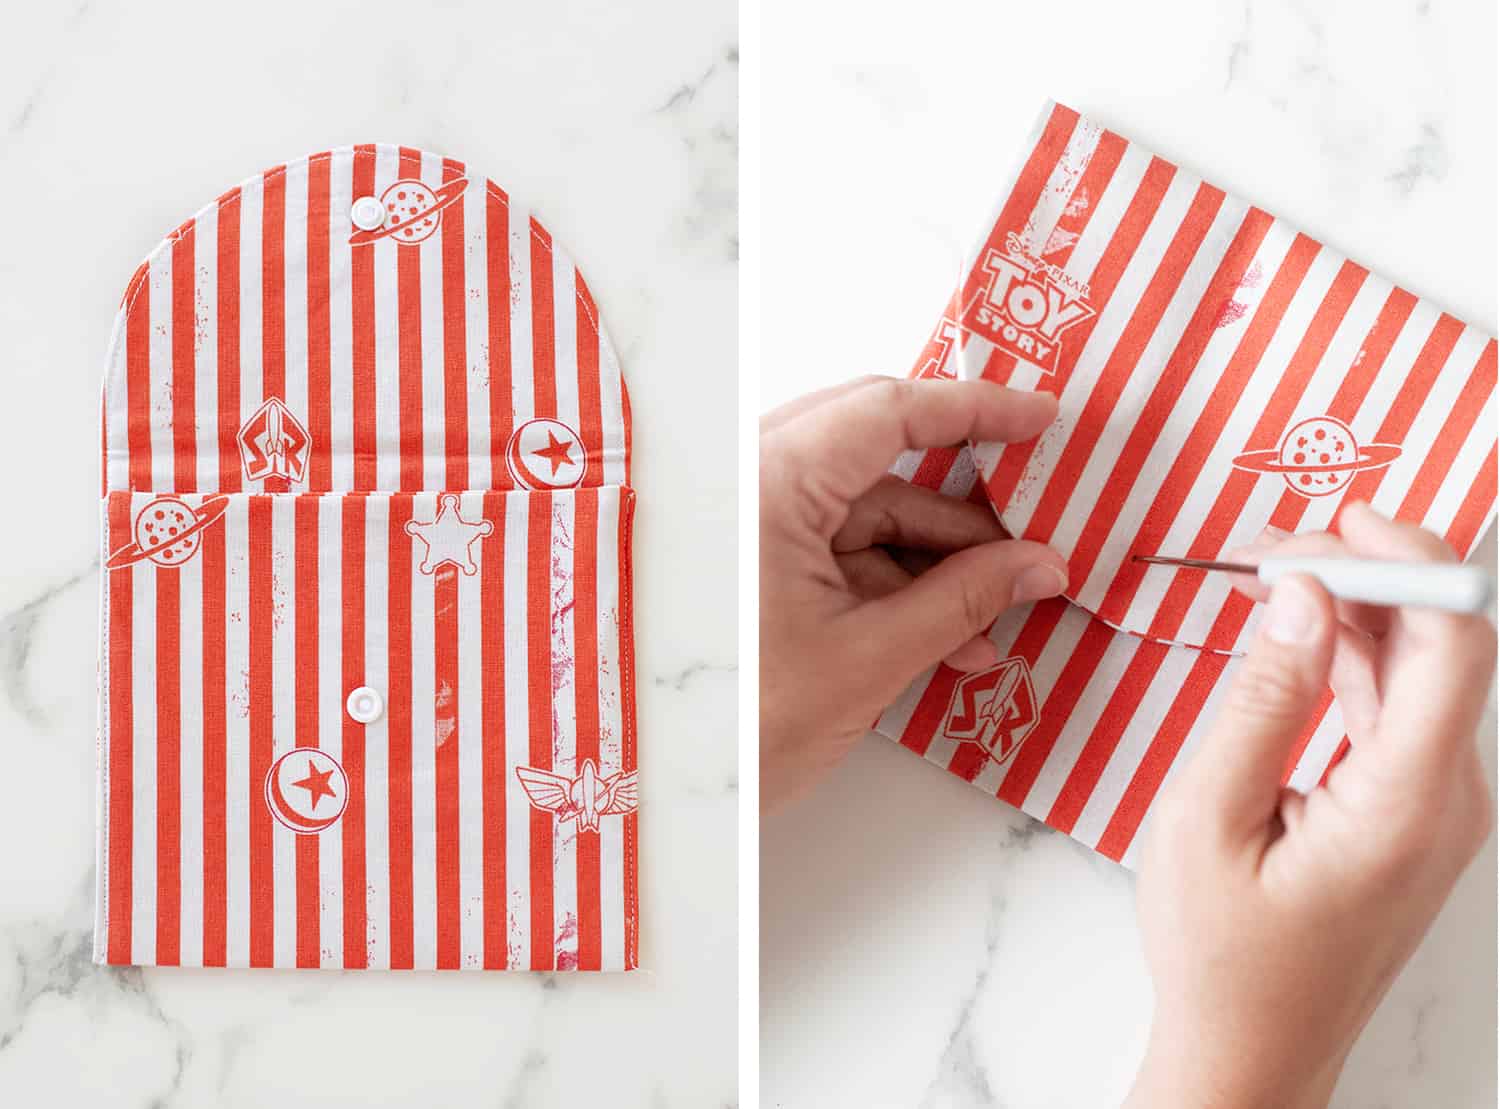 Step Five: Stitch around the pinned edge of the fabric staying very close to the edge. Continue your stitches onto the round flap and down to the other side. Then add a snap.
Tip: If you don’t have snap pliers, you may choose to use a sew-on snap or stitch some velcro here instead.
Step Six: Poke a hole using the metal piercing provided in the Dritz snap pliers. Make sure the piercer also makes a mark on the bottom part of the pouch so the snap pieces will line up properly. But don’t poke a hole through the back side of the pouch!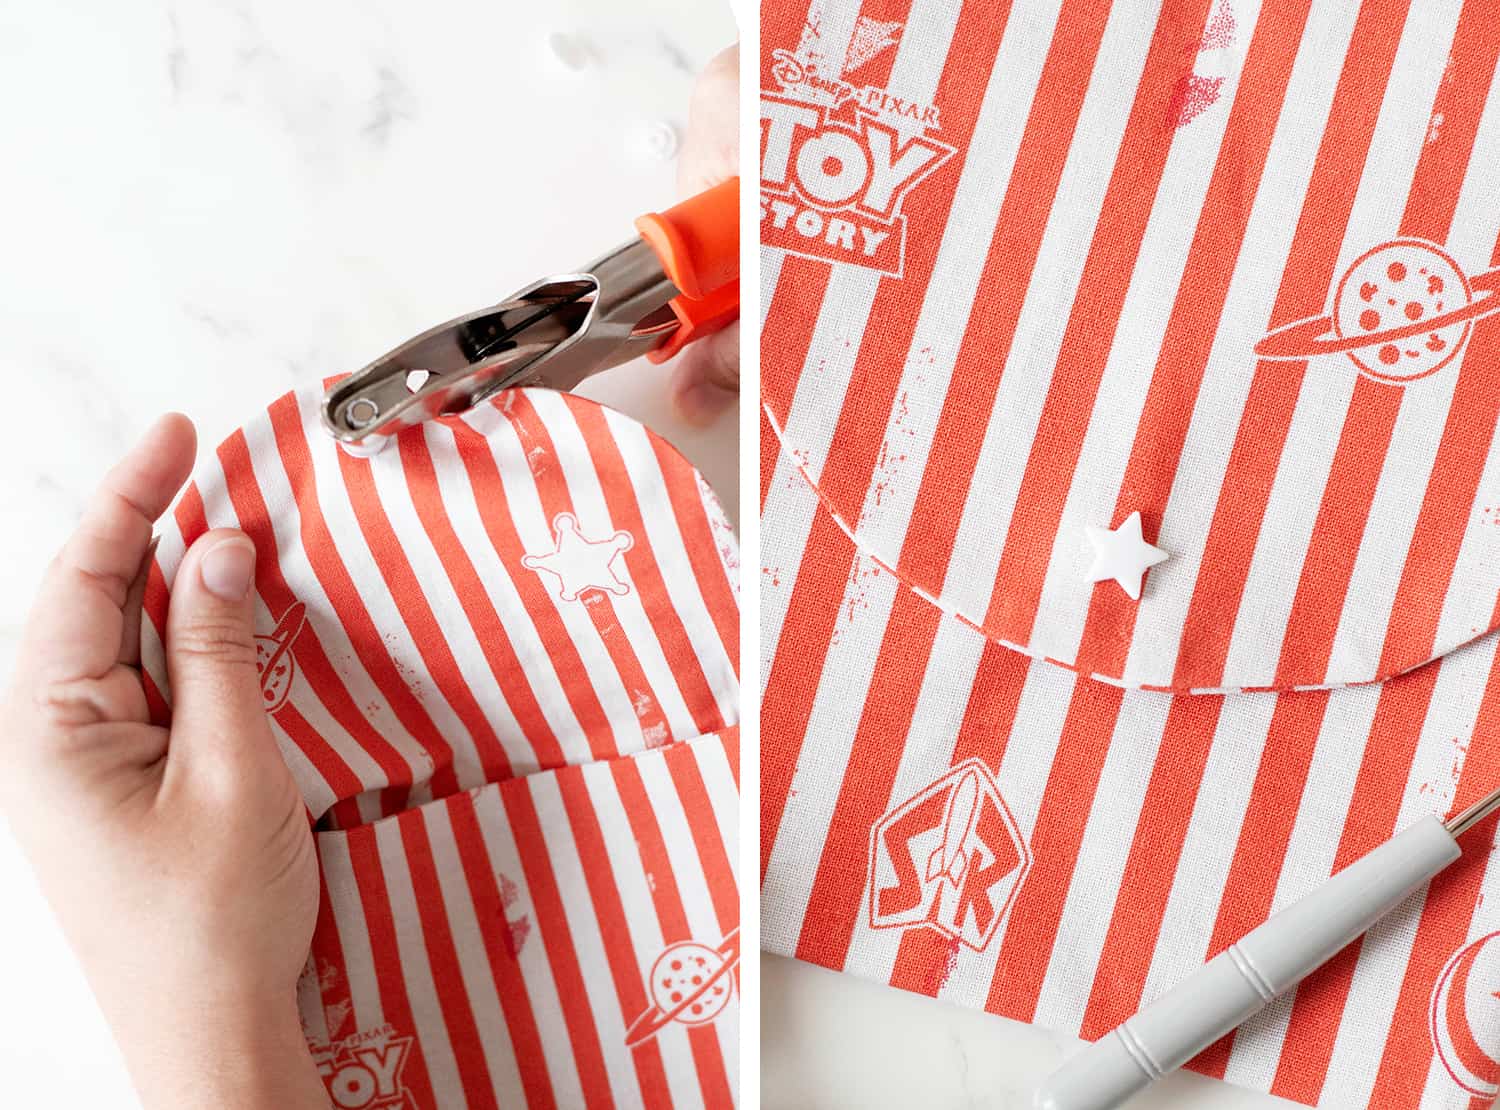 Step Seven: Attach the decorative top piece of the snap using the snap pliers, following the directions provided on the packaging. Then do the same for the bottom snap part.
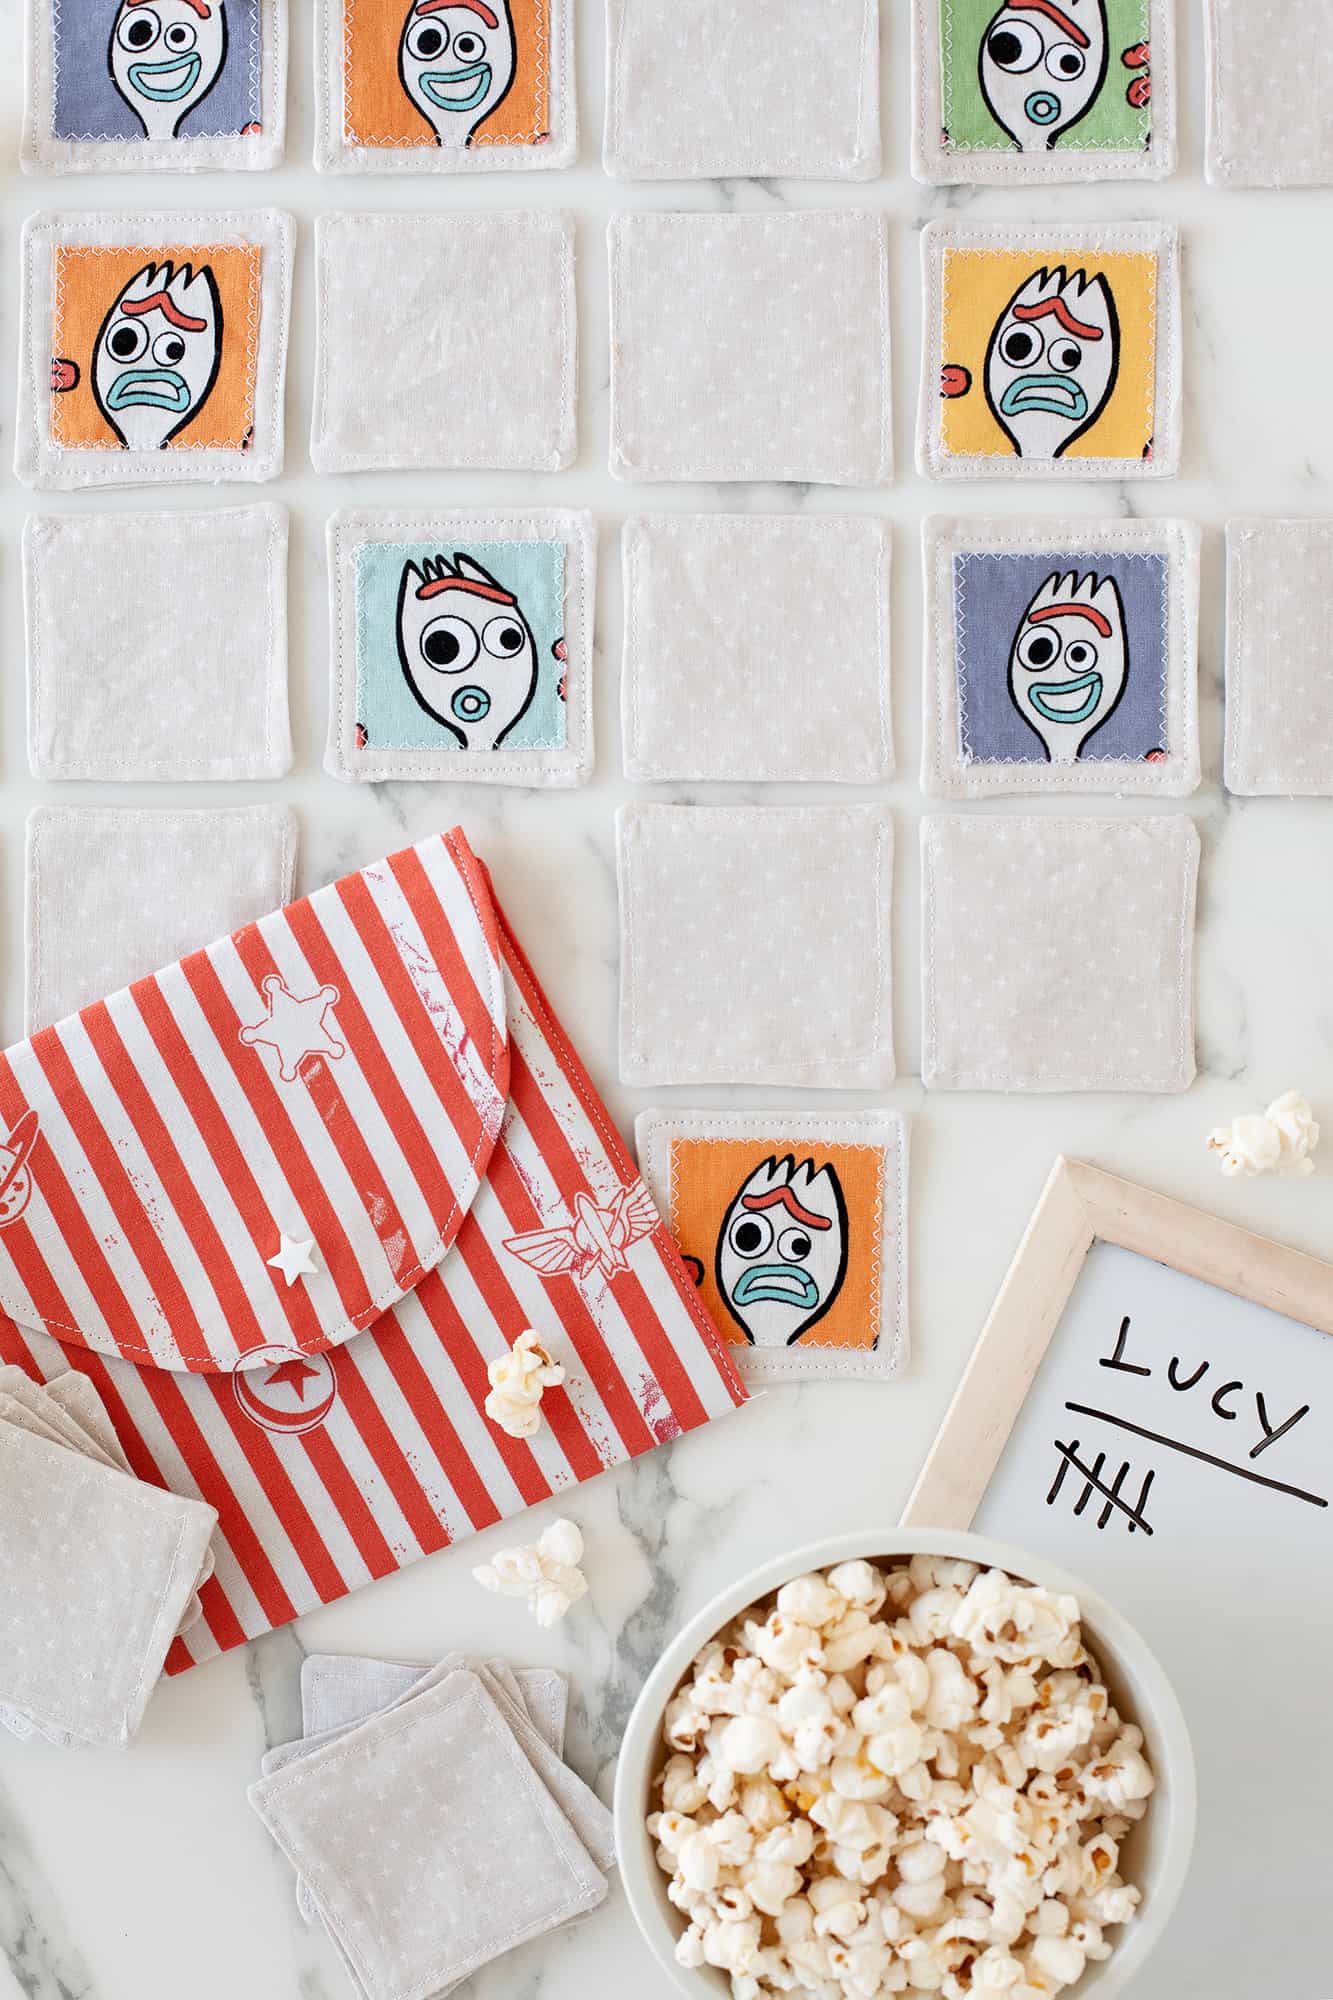
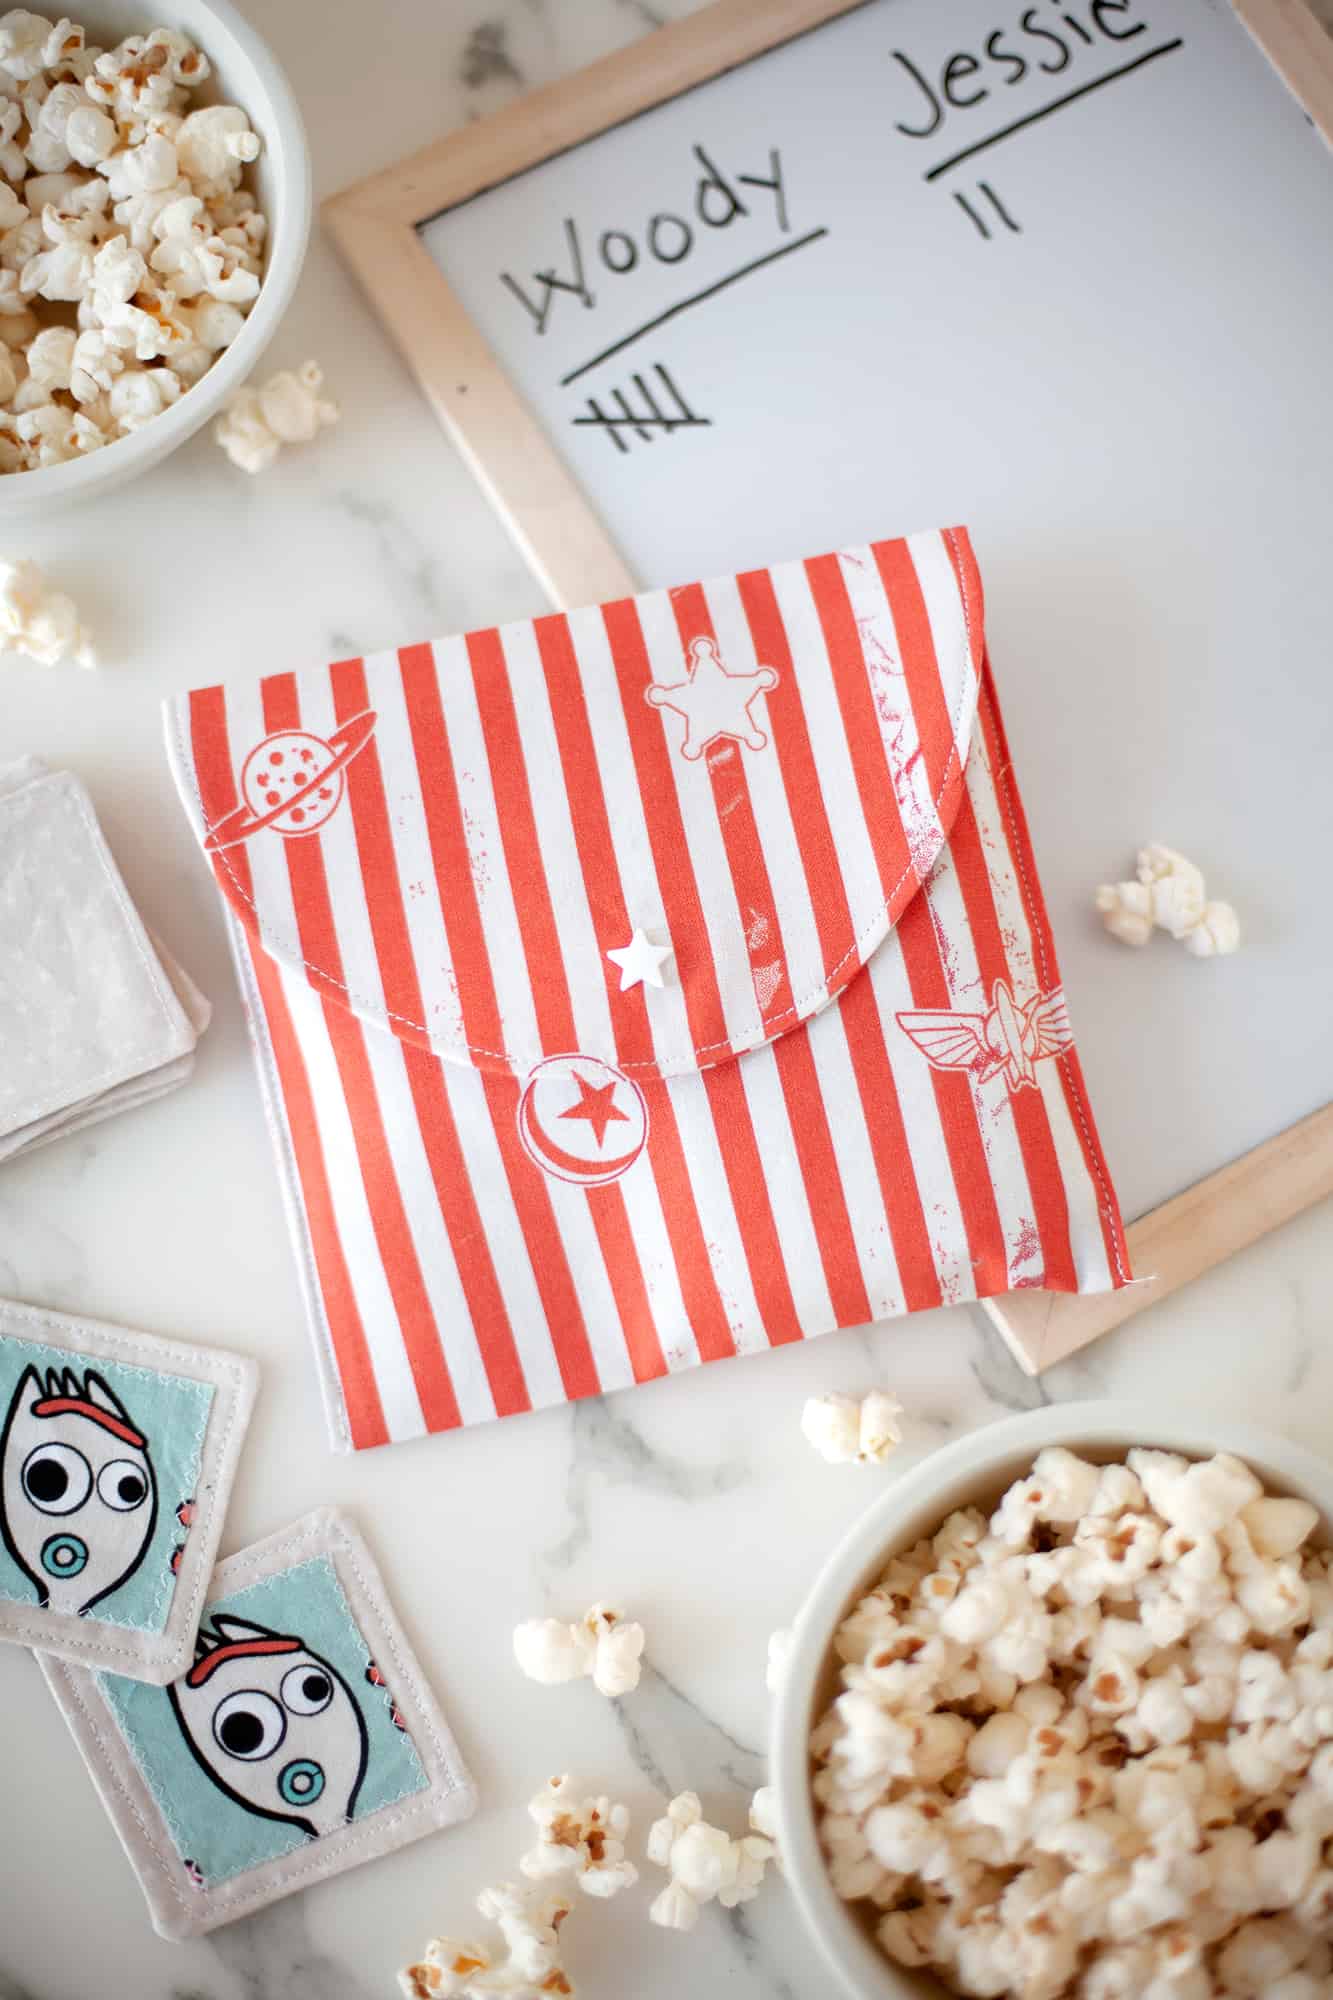 This is a great little game set for bringing on family trips or for bringing along on a fun lunch date with a kiddo you love. If the game gets dirty, don’t worry! Just throw the pieces into the wash. They shouldn’t warp or shrink if you properly pre-washed everything in step one.
 We’ve been enjoying playing this fabric memory game together as a family this week, and are so excited to see Toy Story 4 in theaters this weekend! –Mandi
P.S. If you love DIY games, check out our Portable Tic-Tac-Toe Game or DIY Fabric Fishing Game!
Credits//Author and Photography: Mandi Johnson. Photos edited with A Color Story Desktop.


These are too cute! How do you think these would hold up with 2 year olds?
Such a cool idea, thanks for sharing!!
-Kate
https://daysofkate.com/
This is so cute! I love the choice of background colours!
Charmaine Ng | Architecture & Lifestyle Blog
http://charmainenyw.com